Main Window interface
Multi device support
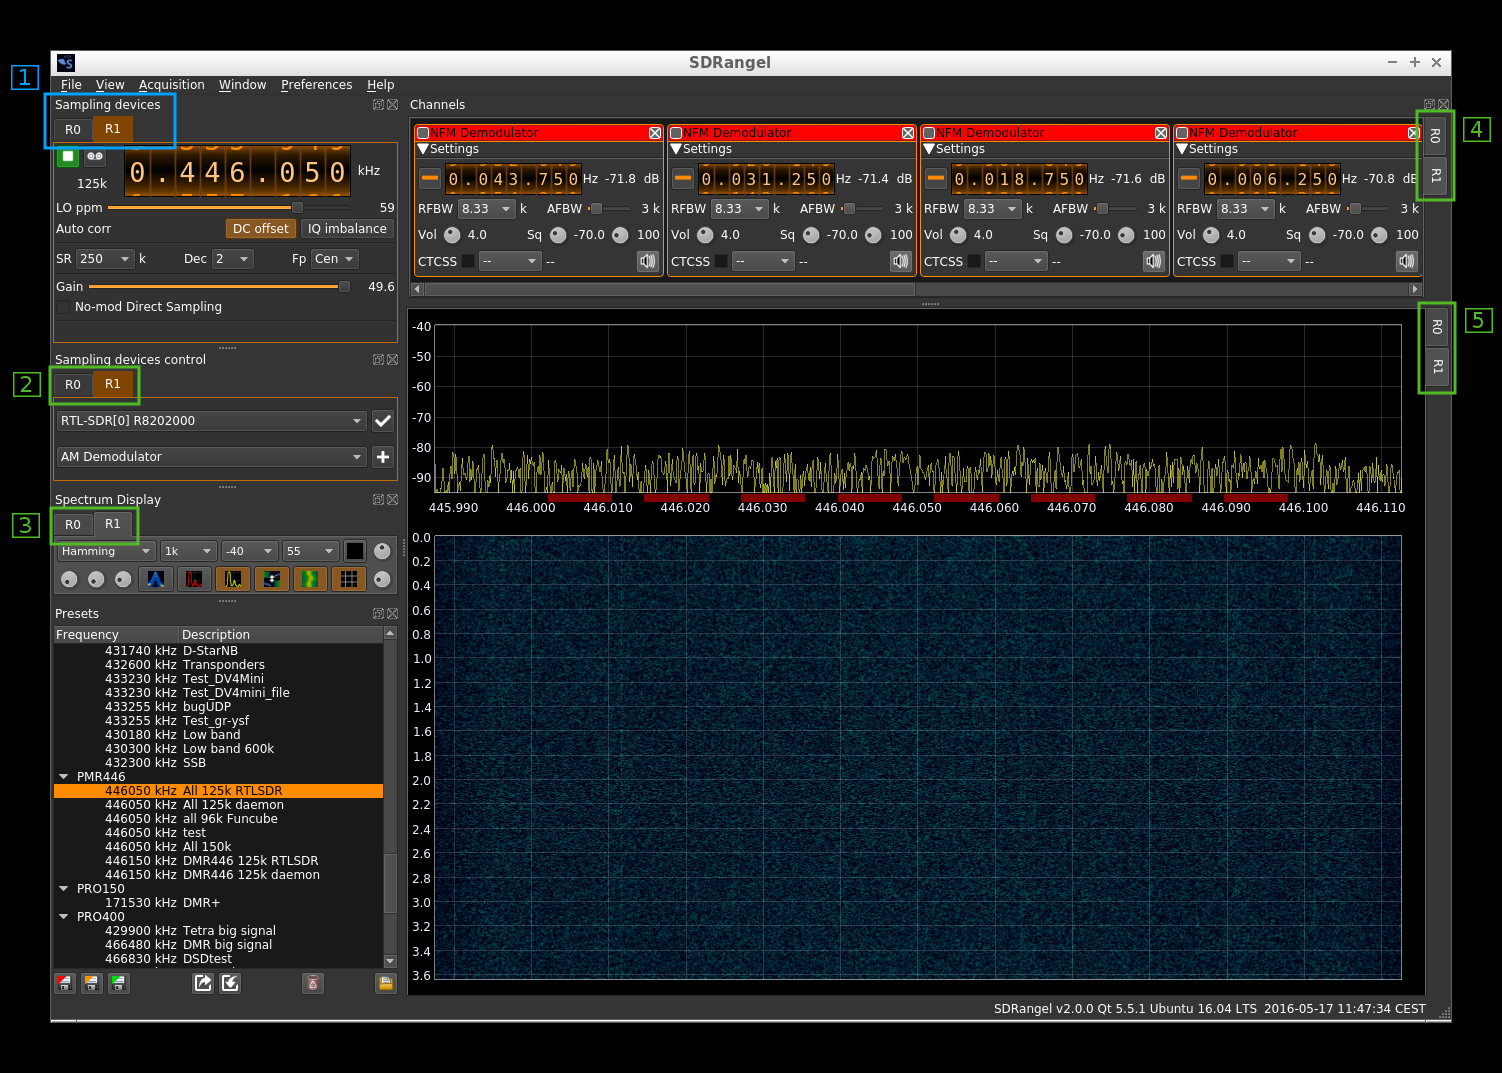
Starting with version 2 SDRangel supports several sampling devices simultaneously. A set of tabs is dedicated to each device marked R0, R1, R2... The tabbed windows are:
- Sampling devices (1)
- Sampling devices control (2)
- Spectrum display control (3)
- Channels (4)
- Spectrum from device (5)
The sampling devices tab (1) acts as a master and when one of its tabs is selected all other tabs are selected accordingly i.e. all R0s, all R1s, etc... in tabs (2), (3), (4) and (5)
In each slave tab group (2), (3), (4) and (5) an individual tab corresponding to one device can be selected without affecting the selection of the other tabs. This way you can sneak peek into another spectrum or channel goup without affecting the display of other tabbed windows.
Main areas
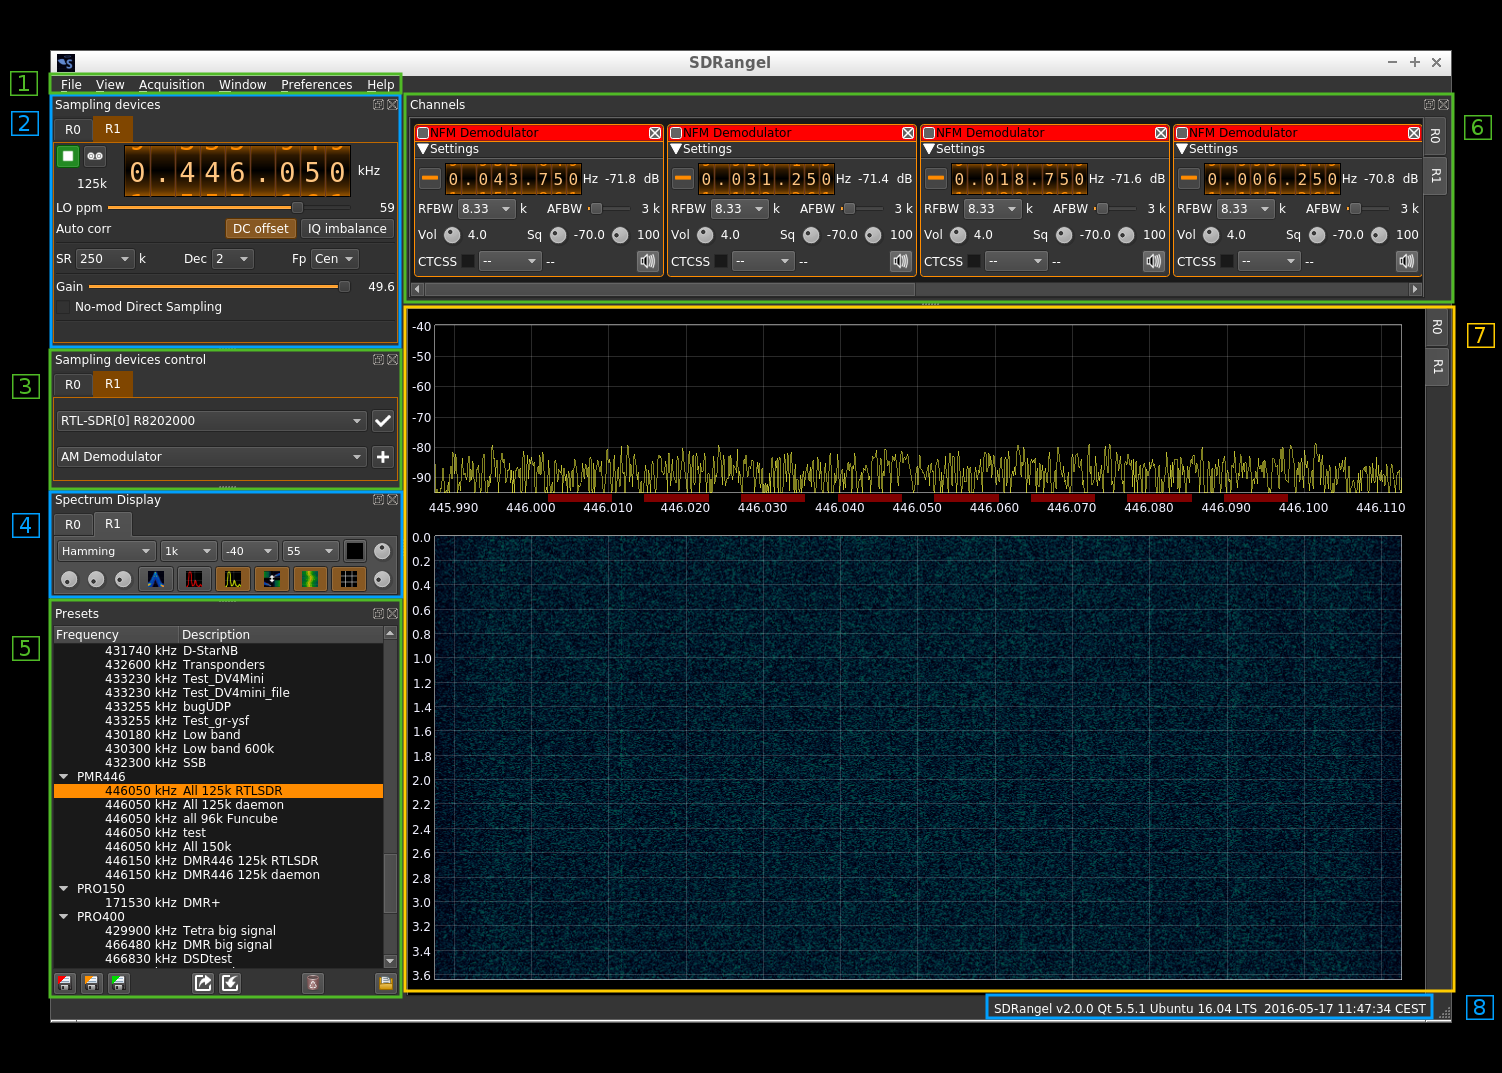
1. Main menu
The following items are presented hierarchically from left to right:
- File:
- Exit (shortcut Ctl-Q): Exit the program
- View:
- Fullscreen (Shortcut F11): Toggle full screen mode
- Acquisition:
- Add device: adds a new sampling device tab set to the device stack (last position)
- Remove device: removes the last sampling device tab set
- Window: presents the list of dockable windows. Check to make it visible. Uncheck to hide. These windows are:
- Sampling devices control: control of which sampling devices is used and add channels
- Sampling devices: the sampling devices UIs
- Spectrum display: the main spectrum displays (output from the sampling devices)
- Presets: the saved presets
- Channels: the channels active for each device
- Preferences:
- Audio: opens a dialog to choose the audio output device
- DV serial: if you have one or more AMBE3000 serial devices for AMBE digital voice check to connect them. If unchecked DV decoding will resort to mbelib if available else no audio will be produced for AMBE digital voice Help:
- Laoded Plugins: shows details about the loaded plugins (see next)
- About: current version and blah blah.
Loaded plugins display
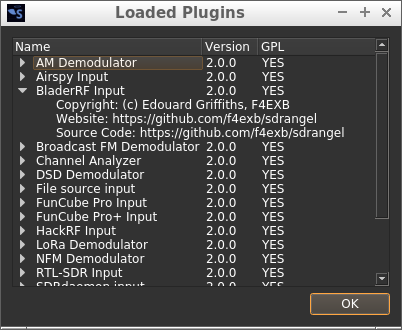
When clicking on Help -> Loaded Plugins from the main menu bar a dialog box appears that shows information about the plugins loaded in SDRangel:
Name
Plugin display name. Tells briefly what this plugin is about.
Version
Starting with SDRangel version 2.0.0 this is the SDRangel version when the plugin was last updated.
GPL
Tells if the plugin is under GPL license.
Expansion
The plugin entry can be expanded or collapsed using the caret on the left. When expanded it shows more information about the copyright of the author and locations on the web where the plugin can be found. In all cases this is just here.
OK button
Click here when done to dismiss the dialog.
2. Sampling devices
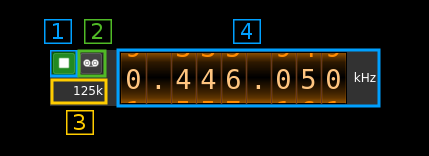
This is where the plugin GUI specific to the device is displayed. Control of one device is done from here. The common controls are:
2.1. Start or stop acquisition
- When a play icon is displayed with a grey background the device is not operational
- When a play icon is displayed with a blue background the device is ready to start
- When a square icon is displayed with a green background the device is currently running
- When a play icon is displayed with a red background there is an error and a popup displays the error message. An Error typically occurs when you try to start the same device in more than one tab.
2.2. Record I/Q
This is the I/Q from device record toggle. When a red background is displayed the recording is currently active.
2.3. Device sampling rate
This is the sampling rate in kS/s of the I/Q stream extracted from the device after possible decimation. The main spectrum display corresponds to this sampling rate.
2.4. Center frequency
This is the current center frequency in kHz with dot separated thousands (MHz, GHz). On devices for which frequency can be directly controlled (i.e. all except File Source and SDRdaemon) you can use the thumbwheels to set the frequency. Thumwheels move with the mouse wheel when hovering over a digit and when a digit is selected by clicking on it you can also use the arrows to move the corresponding thumbwheel.
Additional inputs
Most devices will also present an interface to control automatic DC removal and I/Q imbalance and also a control of the LO correction in ppm.
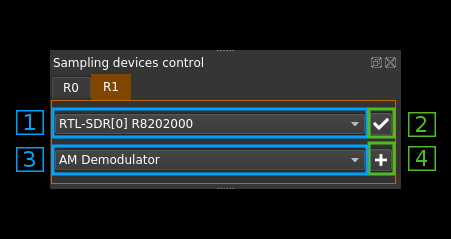
3. Sampling devices control
This is where the sampling device for one device set is selected and the channel plugins are instantiated.
3.1. Sampling device selector
Use this combo box to select one sampling device
3.2. Sampling device selection confirmation
Use this push button to confirm the selection and change the sampling device
3.3. Channel selector
Use this combo box to select a channel plugin to create a new channel
3.4. Add a new channel
Use this push button to add a new channel with the selected plugin
4. Spectrum display control
These are the controls of the main spectrum display in (7). Please refer to the spectrum display documentation (TBD) for details.
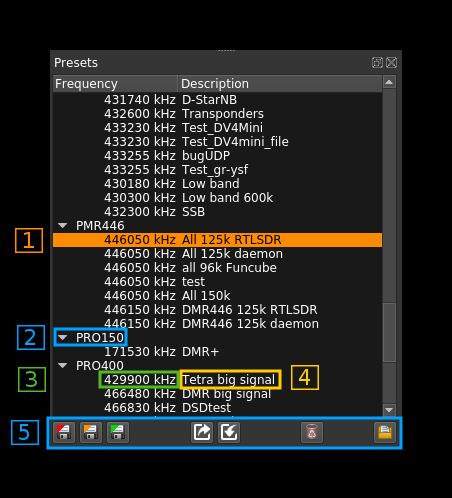
5. Presets
This is a tree view of the saved presets. Presets record the channels setup and a copy of the settings of each sample source that has been used when saving this preset. Thus you can use the same channel arrangement with various devices having their particular setup.
5.1. Preset selection
You select a preset by clicking on its line in the tree view. All actions (5) will be done relative to this preset.
5.2. Group
You can organize your presets into groups. Groups can be collapsed or expanded by using the caret icon on the left.
5.3. Center frequency
The center frequency used in this preset is displayed here.
5.4. Preset name
You can give a name to your preset. Names need not to be unique.
5.5. Preset control or actions
The controls are located as icons at the bottom of the window:
5.5.1. New preset
Click on this icon to create a new preset with the current values in the selected sample device tab (Main window: 2).
5.5.2. Update preset
Click on this icon to create a update the selected preset with the current values in the selected sample device tab (Main window: 2). Please note that this does not save the preset immediately on disk to save presets immediately you need to use the next icon.
5.5.3. Save presets
Presets are saved to disk automatically at exit time you can however request to save them immediately using this icon.
5.5.4. Export preset
Using the previous icon presets are saved globally in a system dependent place. Using this icon you can export a specific preset in a single file that can be imported on another machine possibly with a different O/S. The preset binary data (BLOB) is saved in Base-64 format.
5.5.5. Import preset
This is the opposite of the previous operation. This will create a new preset in the selected group or the same group as the preset being selected.
5.5.6. Delete preset
This deletes the selected preset. It takes no action if a group is selected.
5.5.7. Load preset
Applies the selected preset to the current device set (source and channel plugins).
6. Channels
This area shows the control GUIs of the channels curently active for the device. When the preset is saved (as default at exit time or as a saved preset) the GUIs are ordered by increasing frequency. If presets share the same frequenccy they are ordered by their internal ID name. Thus new channel GUIs will appear ordered only when reloaded.
Details about the GUIs can be found in the channel plugins documentation which consits of a readme.md file in each of the channel plugins folder (done partially).
7. Spectrum from device
This shows the spectrum in the passband returned from the sampling device possibly after decimation. The actual sample rate is shown in the device control at the left of the frequency display (2.3)
The spectrum display is cotrolled by the display control (4).
8. Status
8.1. SDRangel version
Self explanatory
8.2. Qt version
Qt version with which this copy of SDRangel was compiled.
8.3. System
Pretty print of the system in which SDRangel is running.
8.4. Local date
Local date according to system clock
8.5. Local time
Local time according to system clock followed by the time zone code.
