| .. | ||
| CMakeLists.txt | ||
| demoddsd.pro | ||
| dsddecoder.cpp | ||
| dsddecoder.h | ||
| dsddemod.cpp | ||
| dsddemod.h | ||
| dsddemodgui.cpp | ||
| dsddemodgui.h | ||
| dsddemodgui.ui | ||
| dsddemodplugin.cpp | ||
| dsddemodplugin.h | ||
| readme.md | ||
DSD (Digital Speech Decoder) demodulator and decoder plugin
Introduction
This plugin uses the DSDcc library that has been rewritten from the original DSD program to decode several digital speech formats. At present it covers the following:
- DMR/MOTOTRBO: ETSI two slot TDMA standard. MOTOTRBO is a popular implementation of this standard.
- dPMR: Another ETSI standard at slower rate (2400 Baud / 6.25 kHz) and FDMA
- D-Star: developed and promoted by Icom for Amateur Radio customers.
It can only detect the following standards (no data, no voice):
- Yaesu System Fusion (YSF): developed and promoted by Yaesu for Amateur Radio customers.
- NXDN: A joint Icom (IDAS) and Kenwood (Nexedge) standard with 2400 and 4800 Baud versions.
The modulation and standard is automatically detected and switched depending on the Baud rate chosen.
To enable this plugin at compile time you will need to have DSDcc installed in your system. Please follow instructions in DSDcc readme to build and install DSDcc. If you install it in a custom location say /opt/install/dsdcc you will need to add these defines to the cmake command: -DLIBDSDCC_INCLUDE_DIR=/opt/install/dsdcc/include/dsdcc -DLIBDSDCC_LIBRARIES=/opt/install/dsdcc/lib/libdsdcc.so
DV serial device support
You can use a serial device connected to your system that implements and exposes the packet interface of the AMBE3000 chip. This can be for example a ThumbDV USB dongle. In order to support DV serial devices in your system you will need two things:
- Compile with SerialDV support Please refer to this project Readme.md to compile and install SerialDV. If you install it in a custom location say
/opt/install/serialdvyou will need to add these defines to the cmake command:-DLIBSERIALDV_INCLUDE_DIR=/opt/install/serialdv/include/serialdv -DLIBSERIALDV_LIBRARY=/opt/install/serialdv/lib/libserialdv.so - Enable DV serial devices in your system by checking the option in the Preferences menu. YOu will need to enable the DV serial devices each time you start SDRangel.
Although such serial devices work with a serial interface at 400 kb in practice maybe for other reasons they are capable of handling only one conversation at a time. The software will allocate the device dynamically to a conversation with an inactivity timeout of 1 second so that conversations do not get interrupted constantly making the audio output too choppy. In practice you will have to have as many devices connected to your system as the number of conversations you would like to be handled in parallel.
Note also that this is not supported in Windows because of trouble with COM port support (contributors welcome!).
Altermatively you can use software decoding with Mbelib. Possible copyright issues apart (see next) the audio quality with the DVSI AMBE chip is much better.
Mbelib support
DSDcc itself can use mbelib to decode AMBE frames. While DSDcc is intended to be patent-free, mbelib that it uses describes functions that may be covered by one or more U.S. patents owned by DVSI Inc. The source code itself should not be infringing as it merely describes possible methods of implementation. Compiling or using mbelib may infringe on patents rights in your jurisdiction and/or require licensing. It is unknown if DVSI will sell licenses for software that uses mbelib.
If you are not comfortable with this just do not install DSDcc and/or mbelib and the plugin will not be compiled and added to SDRangel. For packaged distributions just remove:
- For Linux distributions:
plugins/channel/libdemoddsd.so - For Windows distributions:
dsdcc.dll,mbelib.dll,plugins\channel\demoddsd.dll
For software built fron source if you choose to have mbelib support you will need to have DSDcc compiled with mbelib support. You will also need to have defines for it on the cmake command. If you have mbelib installed in a custom location, say /opt/install/mbelib you will need to add these defines to the cmake command: -DLIBMBE_INCLUDE_DIR=/opt/install/mbelib/include -DLIBMBE_LIBRARY=/opt/install/mbelib/lib/libmbe.so
Interface
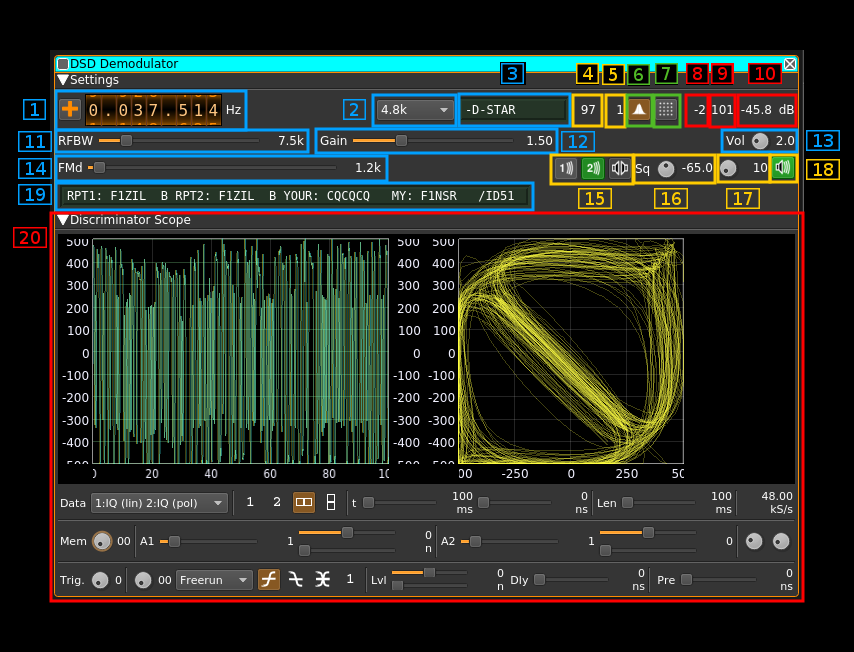
1: Frequency shift from center frequency of reception
Use the wheels to adjust the frequency shift in Hz from the center frequency of reception. Use the "+/-" button on the left side to toggle between positive and negative shift.
2: Symbol (Baud) rate
Here you can specify which symbol rate or Baud rate is expected. Choices are:
2.4k: 2400 S/s used for dPMR and 4800 b/s NXDN4.8k: 4800 S/s used for 9600 b/s NXDN, DMR, D-Star and YSF.
3: Type of frame detected
This can be one of the following:
+DMRd: non-inverted DMR data frame+DMRv: non-inverted DMR voice frame+D-STAR: non-inverted D-Star frame-D-STAR: inverted D-Star frame+D-STAR_HD: non-inverted D-Star header frame encountered-D-STAR_HD: inverted D-Star header frame encountered+dPMR: non-inverted dPMR non-packet frame+NXDN: non-inverted NXDN frame (detection only)+YSF: non-inverted Yaesu System Fusion frame (detection only)
4: Symbol synchronization zero crossing hits in %
This is the percentage per symbols for which a valid zero crossing has been detected. This can display 101% because somtimes there are two crossings per symbol period at the start of a sequence. The more the better the symbol synchronization is tracked however the zero crossing shifts much not deviate too much from 0 (see next).
5: Zero crossing shift
This is the current (at display polling time) zero crosing shift. It should be the closest to 0 as possible. However some jitter is acceptable for good symbol synchronization:
2400 S/s: +/- 5 inclusive4800 S/s: +/- 2 inclusive
6: Matched filter toggle
Normally you would always want to have a matched filter however on some strong D-Star signals more synchronization points could be obtained without. When engaged the background of the button is lit in orange.
7: Transition constellation or symbol synchronization signal toggle
Using this button you can either:
- show the transitions constellation
- show a indicative signal about symbol synchronization
- when a zero crossing is detected the signal is set to estimated input discriminator signal maximum value
- when the symbol clock is 0 (start of symbol period) the signal is set to the estimated median point of the input discriminator signal
8: Discriminator input signal median level in %
This is the estimated median level (center) of the discriminator input signal in percentage of half the total range. When the signal is correctly aligned in the input range it should be 0
9: Discriminator input signal level range in %
This is the estimated discriminator input signal level range (max - min) in percentage of half the total range. For optimal decoding it should be maintained close to 100.
10: Channel power
Total power in dB relative to a +/- 1.0 amplitude signal received in the pass band.
11: Channel bandwidth before discriminator
This is the bandwidth of the pre-discriminator filter
12: Gain after discriminator
This is the gain applied to the output of the discriminator before the decoder
13: Audio volume
When working with mbelib this is a linear multiplication factor. A value of zero triggers the auto gain feature.
With the DV serial device(s) amplification factor in dB is given by (value - 3.0)*5.0. In most practical cases the middle value of 5.0 (+10 dB) is a comfortable level.
14: Maximum expected FM deviation
This is the deviation in kHz leading to maximum (100%) deviation. You should aim for 30 to 50% (+/-300 to +/-500m) deviation on the scope display.
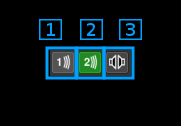
15: Two slot TDMA handling
This is useful for two slot TDMA modes that is only DMR at present. FDMA modes are treated as using slot #1 only.
15.1: Slot #1 voice select
Toggle button to select slot #1 voice output. When on waves appear on the icon. The icon turns green when voice frames are processed for this slot. For FDMA modes you may want to leave only this toggle on.
15.2: Slot #2 voice select
Toggle button to select slot #2 voice output. When on waves appear on the icon. The icon turns green when voice frames are processed for this slot. For FDMA modes you may want to leave this toggle off.
15.3: TDMA stereo mode toggle
- When off the icon shows a single loudspeaker. It mixes slot #1 and slot #2 voice as a mono audio signal
- When on the icon shows a pair of loudspeakers. It sends slot #1 vocie to the left stereo audio channel and slot #2 to the right one
For FDMA standards you may want to leave this as mono mode.
16: Squelch level
The level corresponds to the channel power above which the squelch gate opens.
17: Squelch time gate
Number of milliseconds following squelch gate opening after which the signal is actually fed to the decoder. 0 means no delay i.e. immediate feed.
18: Audio mute and squelch indicator
Audio mute toggle button. This button lights in green when the squelch opens.
19: Format specific status display
When the display is active the background turns from the surrounding gray color to dark green. It shows informatory or status messages that are particular to each format.
19.1: D-Star status display
These is the standard D-Star embedded information that is read from the header frame.
19.1.1: Repeater 1 callsign
19.1.2: Repeater 2 callsign
19.1.3: Destination (your) callsign
19.1.4: Origin (my) callsign
19.2: DMR status display
- Note 1: statuses are polled at ~1s rate and therefore do not reflect values instantaneously. As a consequence some block types that occur during the conversation may not appear.
- Note 2: status values remain unchanged until a new value is available for the channel or the transmissions stops then all values of both channels are cleared
19.2.1: Station role
BS: base stationMS: mobile stationNA: not applicable or could not be determined (you should not see this normally)
19.2.2: TDMA slot #0 status
For mobile stations on an inbound channel there is no channel identification (no CACH) so information goes there by default.
19.2.3: TDMA slot #1 status
19.2.4: Channel status and color code
This applies to base stations and mobile stations in continuous mode that is transmissions including the CACH sequences.
-
The first character is either:
*: Busy. That is the AT bit on the opposite channel is on.: Clear. That is the AT bit on the opposite channel is off/: The CACH could not be decoded and information is missing
-
The two next characters are either:
- The color code from 0 to 15 (4 bits)
--: The color code could not be decoded and information is missing
19.2.5: Slot type
This is either:
VOX: voice blockIDL: data idle blockVLC: voice Link Control data blockTLC: terminator with Link Control information data blockCSB: CSBK (Control Signalling BlocK) data blockMBH: Multi Block Control block header data blockMBC: Multi Block Control block continuation data blockDAH: Data header blockD12: 1/2 rate data blockD34: 3/4 rate data blockDB1: full rate data blockRES: reserved data blockUNK: unknown data type or could not be decoded
19.2.6: Addressing information
String is in the form: 02223297>G00000222
- At the left of the
>sign this is the source address (24 bits) as defined in the DMR ETSI standard - The first character at the right of the
>sign is the address type indicator:G: group addressU: unit (individual) address
- Next on the right is the target address (24 bits) as defined in the DMR ETSI standard
19.3: dPMR status display
19.3.1: dPMR frame tyoe
--: undeterminedHD: Header of FS1 typePY: Payload frame of a sitll undetermined typeVO: Voice frameVD: Voice and data frameD1: Data without FEC frameD2: Data with FEC frameXS: Extended search: looking for a new payload frame when out of sequenceEN: End frame
19.3.2: Colour code
Colour code in decimal (12 bits)
19.3.3: Own ID
Sender's identification code in decimal (24 bits)
19.3.4: Called ID
Called party's identification code in decimal (24 bits)
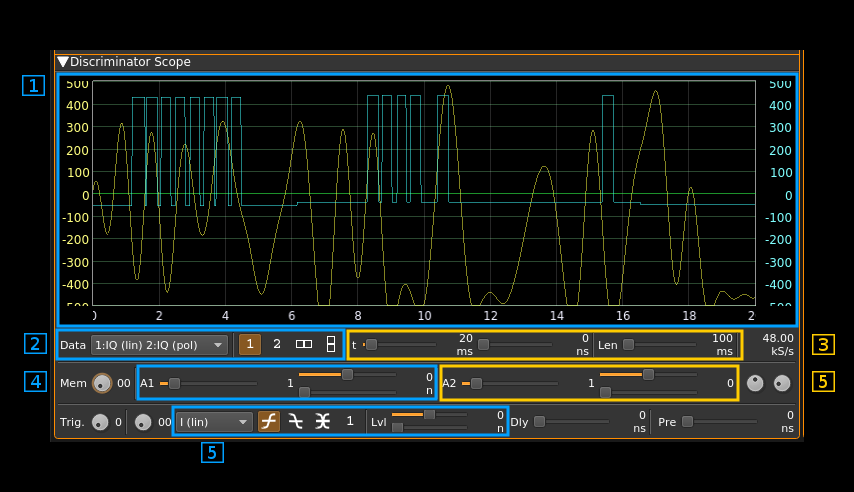
20: Discriminator output scope display
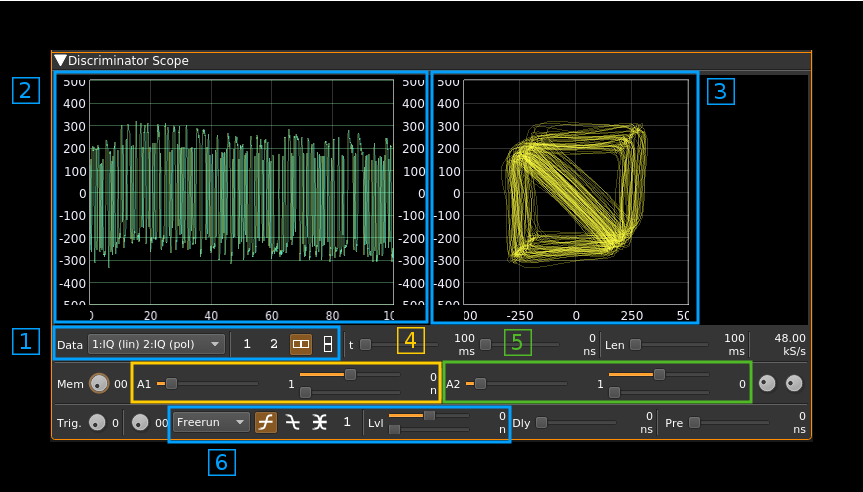
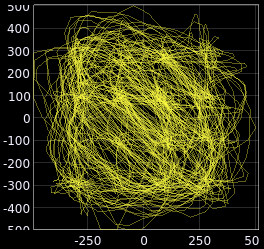
20.1 Transitions constellation display
This is selected by the transition constellation or symbol synchronization signal toggle (see 7)
The discriminator signal at 48 kS/s is routed to the scope display with the following connections:
- I signal: the discriminator samples
- Q signal: the discriminator samples delayed by the baud rate i.e. one symbol delay:
- 2400 baud: 20 samples
- 4800 baud: 10 samples
- 9600 baud: 5 samples
This allows the visualization of symbol transitions which depend on the type of modulation.
20.1.1: Setting the display
- On the combo box you should choose IQ (lin) for the primary display and IQ (pol) for secondary display
- On the display buttons you should choose the side by side display
On the same line you can choose any trace length. If it is too short the constellation points will not appear clearly and if it is too long the polar figure will be too dense. Usually 100ms give good results.
20.1.2: IQ linear display
The yellow trace (I) is the direct trace and the blue trace (Q) is the delayed trace. This can show how symbols differentiate between each other in a sort of eye diagram.
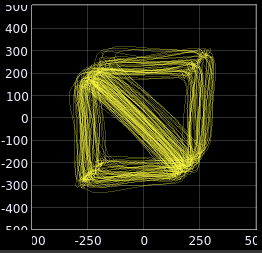
20.1.3: IQ polar display
This shows the constellation of transition points. You should adjust the frequency shift to center the figure and the maximum deviation and/or discriminator gain to contain the figure within the +/-0.4 square. +/- 0.1 to +/- 0.3 usually give the best results.
2-FSK or 2-GFSK
This concerns the following formats:
- D-Star
There are 4 possible points corresponding to the 4 possible transitions. x represents the current symbol and y the previous symbol. The 4 points given by their (y,x) coordinates correspond to the following:
- (1, 1): upper right corner. The pointer can stay there or move to (1, -1)
- (1, -1): upper left corner. The pointer can move to (-1, -1) or (-1, 1)
- (-1, 1): lower right corner. The pointer can move to (1, -1) or (1, 1)
- (-1, -1): lower left corner. The pointer can stay there or move to (-1, 1)
As you can see the pointer can make all moves except between (-1, -1) and (1,1) hence all vertices between the 4 points can appear except the one between the lower left corner and the upper right corner.
4-FSK or 4-GFSK
This concerns the following formats:
- DMR
- YSF
- dPMR
- NXDN
There are 16 possible points corresponding to the 16 possible transitions between the 4 dibits. The 4 dibits are equally spaced at relative positions of -3, -1, 1, 3 hence the 16 points are also equally spaced between each other on the IQ or (x,y) plane.
Because not all transitions are possible similarly to the 2-FSK case pointer moves from the lower left side of the diagonal to the upper right side are not possible.
20.1.4: I gain
You should set the slider to a unity (1) span (+/- 0.5) with no offset. This corresponds to full range in optimal conditions (100%). You can set the slider fully to the left (2) for a +/- 1.0 spn if you don't exactly match these conditions.
20.1.5: Q gain
You should set the slider to a unity (1) span (+/- 0.5) with no offset. This corresponds to full range in optimal conditions (100%). You can set the slider fully to the left (2) for a +/- 1.0 spn if you don't exactly match these conditions.
20.1.6: Trigger settings
You can leave the trigger free running or set it to I linear with a 0 threshold.
20.2 Symbol synchronization display
This is selected by the transition constellation or symbol synchronization signal toggle (see 7)
20.2.1 IQ linear display
The I trace (yellow) is the discriminator signal and the Q trace (blue) is the symbol synchronization monitor trace that goes to the estimated maximum discriminator signal level when a zero crossing in the symbol synchronization control signal is detected and goes to mid position ((max - min) / 2) of the discriminator signal when a symbol period starts.
The symbol synchronization control signal is obtained by squaring the discriminator signal and passing it through a narrow second order bandpass filter centered on the symbol rate. Its zero crossing should occur close to the first fourth of a symbol period therefore when synchronization is ideal the Q trace (blue) should go down to mid position in the first fourth of the symbol period.
20.2.2: Setting the display
- On the combo box you should choose IQ (lin) for the primary display and IQ (pol) for secondary display
- On the display buttons you should choose the first display (1)
20.2.3: Timing settings
You can choose any trace length with the third slider from the left however 100 ms will give you the best view. You may stretch further the display by reducing the full length to 20 ms or less using the first slider. You can move this 20 ms window across the 100 ms trace with the middle slider.
20.2.4: I gain
You should set the slider to a unity (1) span (+/- 0.5) with no offset. This corresponds to full range in optimal conditions (100%). You can set the slider fully to the left (2) for a +/- 1.0 spn if you don't exactly match these conditions.
20.2.5: Q gain
You should set the slider to a unity (1) span (+/- 0.5) with no offset. This corresponds to full range in optimal conditions (100%). You can set the slider fully to the left (2) for a +/- 1.0 spn if you don't exactly match these conditions.
20.2.6: Trigger settings
You can leave the trigger free running or set it to I linear with a 0 threshold.
