14 KiB
Audio management
Audio devices can be controlled with two dialogs:
- The Audio preferences dialog: set audio device parameters. The dialog shows one tab for output and another tab for input devices. Detailed in sections 1 and 2.
- The Audio selection dialog: each channel plugin having audio output or input can show this dialog to select which device to use to direct output or input streams. This dialog opens by right clicking on a button that depends on the plugin (see plugin documentation). Detailed in section 3.
1. Audio output preferences
This dialog lets you set preferences for the audio output devices attached to the system. These devices may refer to actual physical devices or be virtual devices defined with Pulseaudio (Linux).
Each device is represented by a row in the list. Move the cursor with the mouse or the arrow keys to select the device you want to configure.
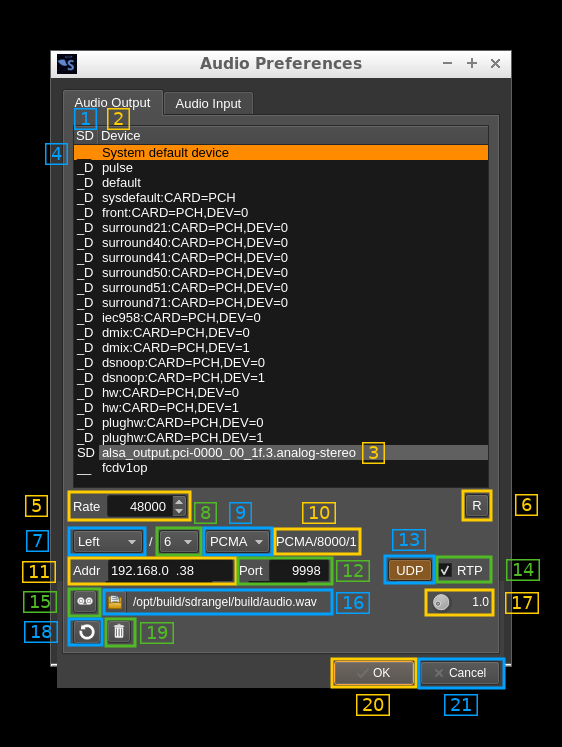
1.1 Indicators column
In this column there are two indicators:
S: for system default device. This is the device that is defined as system default. You may configure it directly or via theSystem default deviceentry.
☞ Note that (at least in Linux) you may affect different parameters to one or the other.D: the device is unregistered so if you associate an output stream to it, it will be registered with default values. Default values are:- Sample rate: 48000 S/s
- UDP address: 127.0.0.1
- UDP port: 9998
- Copy audio to UDP: unchecked (false)
- UDP copy channel mode: mono left channel (Left)
- Decimation factor: 1 (no decimation)
- UDP codec L16 (linear 16 bit)
- Use RTP protocol: unchecked (false)
A unset indicator is marked with an underscore character: _
1.2 Device name
This is the device name defined in the system. In Linux when you define virtual devices (null sinks) with Pulseaudio this is the name you have given when defining the device.
1.3 System default device
The device that is configured as system default is marked with a grey background behind its name
1.4 Selected device
The device currently selected is marked in the selection color (orange). The parameters below are updated with its corresponding values
1.5 Sample rate
This is the device sample rate in samples per second (S/s).
1.6 Reset values to defaults
By pushing this button the values are reset to the defaults (see 1.1 for actual default values)
1.7 UDP copy or recording channel mode
Left: stream is mono (1 channel) and the left audio channel is usedRight: stream is mono (1 channel) and the right audio channel is usedMixed: stream is mono (1 channel) and the mix of left and right audio channels is usedStereo: stream is stereo (2 channels) and both audio channels are used
1.8 Decimation factor
It is possible to decimate the sample rate (1.5) by this value before sending the stream via UDP.
1.9 Codec
This is the codec applied before sending the stream via UDP. The following are available:
L16: Linear 16 bit signed integers (native)L8: Linear 8 bit signed integersPCMA: A-law 8 bit PCM (requires 8000 Hz sample rate mono)PCMU: Mu-law 8 bit PCM (requires 8000 Hz sample rate mono)G722: G722 64 kbit/s (requires 16000 Hz sample rate mono)opus: Opus constant 64 kbit/s (requires 48, 24, 16 or 12 kHz sample rates. 48 kHz makes more sense when using Opus)
1.10 SDP string
This is the SDP string representation of the stream sent via UDP (RTP). In SDP files it is used on the a=rtpmapline (See 1.14). It can be used to check the effect of settings 1.5, 1.8 and 1.9.
1.11 UDP address
This is the destination address of the UDP stream
1.12 UDP port
This is the destination port of the UDP stream
1.13 Copy audio to UDP stream toggle
Use this button to activate or de-activate the copy of the audio stream to UDP stream
1.14 Use RTP protocol over UDP
Check this box to activate the RTP protocol over UDP. RTP parameters are as follows:
- Payload type:
- codec
L16,L8,opus: 96 - codec
PCMA: 8 - codec
PCMU: 0 - codec
G722: 9
- codec
- Sample rate: the resulting stream sample rate after decimation and possible compression:
- codec
PCMA,PCMU: must be 8000 S/s - codec
G722: must be 8000 S/s (16000 S/s input before compression) - codec
opus: timestamp increment is that of 20ms @ 48kHz i.e. 960 but actual payload and sample rate is 160 bytes at 8 kHz
- codec
- Sample format:
- codec
L16: 16 bit integer signed (S16LE) - codec
L8,PCMA,PCMU: 8 bit integer signed (S8) - codec
G722,opus: 8 bit unsigned integer. Note that this is the stream compressed to 64 kbits/s.
- codec
- Channels: 1 for mono (Left, Right and Mixed copy channels mode); 2 for stereo (Stereo copy channels mode)
- Address and port: destination address and port (local on the client machine)
You may read the RTP stream using a SDP file (extension .sdp) that can be read with any program supporting SDP files (VLC, MX player, ffmpeg, ...). For a mono 48000 S/s stream at address `192.168.0.34:9998 and L16 codec the contents of the file would be as follows:
c=IN IP4 192.168.0.34
m=audio 9998 RTP/AVP 96
a=rtpmap:96 L16/48000/1
For PCMA or PCMU (here PCMA):
c=IN IP4 192.168.0.34
m=audio 9998 RTP/AVP 8
a=rtpmap:8 PCMA/8000/1
For G722:
c=IN IP4 192.168.0.34
m=audio 9998 RTP/AVP 9
a=rtpmap:9 G722/8000/1
For Opus mono or stereo:
c=IN IP4 192.168.0.34
m=audio 9998 RTP/AVP 96
a=rtpmap:96 opus/48000/2
a=fmtp:96 cbr=1
☞ Note that on Android clients VLC has trouble working with the RTP stream (choppy audio, hanging unexpectedly...) therefore MX player is recommended.
☞ With PCMA and PCMU and more recently G722 codecs it is possible to listen to the RTP stream directly in the browser using a Janus WebRTC server. Please refer to the Wiki page "Networking audio" for detailed instructions.
1.15 Record audio
Use this button to toggle audio recording. Start or stop recording becomes effective only when the dialog is closed with the "OK" button.
Format is always 16 bit little-endian and can be mono (1 channel) or stereo (2 channels) depending on the selected channel mode (1.7)
1.16 Select recording output file
Click on the open file icon to open a file selection dialog that lets you specify the location and name of the output files.
Each recording is written in a new file with the starting timestamp before the .wav extension in yyyy-MM-ddTHH_mm_ss_zzz format. It keeps the first dot limited groups of the filename before the .wav extension if there are two such groups or before the two last groups if there are more than two groups. Examples:
- Given file name:
test.wavthen a recording file will be like:test.2020-08-05T21_39_07_974.wav - Given file name:
test.2020-08-05T20_36_15_974.wavthen a recording file will be like (with timestamp updated):test.2020-08-05T21_41_21_173.wav - Given file name:
test.first.wavthen a recording file will be like:test.2020-08-05T22_00_07_974.wav - Given file name:
record.test.first.wavthen a recording file will be like:record.test.2020-08-05T21_39_52_974.wav
If a filename is given without .wav extension then the .wav extension is appended automatically before the above algorithm is applied. If a filename is given with an extension different of .wav then the extension is replaced by .wav automatically before the above algorithm is applied.
The file path currently being written (or last closed) appears at the right of the button.
1.17 Record silence time
This is the time in seconds (between 0.1 and 10.0) of silence (null samples) before recording stops. When non null samples come again this will start a new recording. Set the value to 0 to record continuously.
1.18 Cleanup registrations not in the list
Use this button to keep only the visible devices in the devices registrations. The devices registrations with custom parameters are kept in the preferences using the device names. This button makes some tidying up when devices are permanently removed.
1.19 Unregister device
Use this button to remove the device from the devices registrations returning it to the unregistered state. Therefore when associated to an output stream or selected it will initially take default values and appear with the D indicator in the list.
1.20 OK button
Use this button to confirm your changes and close dialog. Note that you can change parameters of only one device at a time.
1.21 Cancel button
Use this button to dismiss your changes and close dialog.
2. Audio input preferences
This dialog lets you set preferences for the audio input devices attached to the system. These devices may refer to actual physical devices or be virtual devices defined with Pulseaudio (Linux).
Each device is represented by a row in the list. Move the cursor with the mouse or the arrow keys to select the device you want to configure.
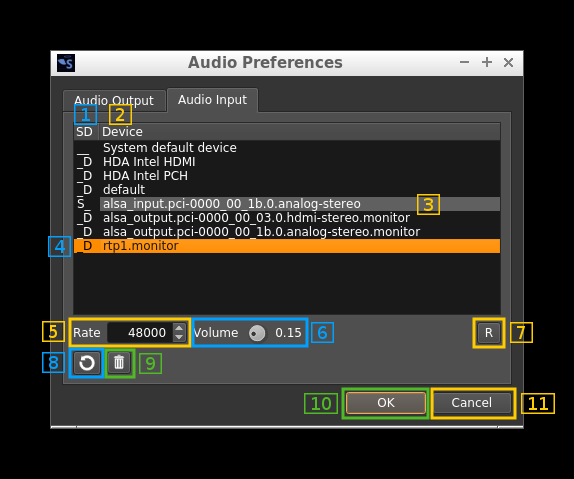
2.1 Indicators column
In this column there are two indicators:
S: for system default device. This is the device that is defined as system default. You may configure it directly or via theSystem default deviceentry.
☞ Note that (at least in Linux) you may affect different parameters to one or the other.D: the device is unregistered so if you associate an input stream to it, it will be registered with default values. Default values are:- Sample rate: 48000 S/s
- Volume: 0.15
A unset indicator is marked with an underscore character: _
2.2 Device name
This is the device name defined in the system. In Linux when you define virtual devices (null sinks) with Pulseaudio an input device is automatically created with the .monitor extension.
2.3 System default device
The device that is configured as system default is marked with a grey background behind its name
2.4 Selected device
The device currently selected is marked in the selection color (orange). The parameters below are updated with its corresponding values
2.5 Sample rate
This is the device sample rate in samples per second (S/s).
2.6 Input volume
This factor in the range [0.01 .. 1.00] is applied to the input before modulation.
2.7 Reset values to defaults
By pushing this button the values are reset to the defaults (see 2.1 for actual default values)
2.8 Cleanup registrations not in the list
Use this button to keep only the visible devices in the devices registrations. The devices registrations with custom parameters are kept in the preferences using the device names. This button makes some tidying up when devices are permanently removed.
2.9 Unregister device
Use this button to remove the device from the devices registrations returning it to the unregistered state. Therefore when associated to an output stream or selected it will initially take default values and appear with the D indicator in the list.
2.10 OK button
Use this button to confirm your changes and close dialog. Note that you can change parameters of only one device at a time.
2.11 Cancel button
Use this button to dismiss your changes and close dialog.
3 Audio device selection
In plugins having audio input or output this dialog can be opened to select the input or output device for the audio stream. The exact button that opens the dialog by right clicking on it depends on the plugin. Generally this will be the audio in selection (microphone icon) for input plugins and the audio mute (loudspeaker icon) for output plugins. You may check the plugin documentation for confirmation.
The dialog for input or output is similar. The screenshot below is taken from an output selection.
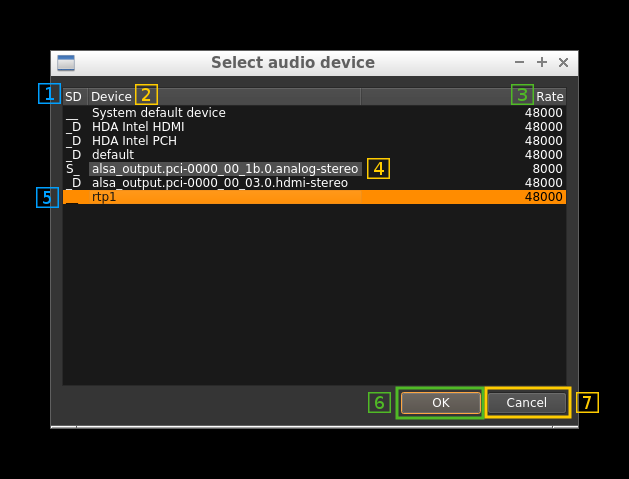
3.1 Indicators column
In this column there are two indicators:
S: for system default device. This is the device that is defined as system default. You may configure it directly or via theSystem default deviceentry.
☞ Note that (at least in Linux) you may affect different parameters to one or the other.D: the device is unregistered so if you associate an input stream to it, it will be registered with default values. Default values depend on the input or output nature and are listed in the 2.1 and 1.1 sections respectively.
A unset indicator is marked with an underscore character: _
3.2 Device name
This is the device name defined in the system.
3.3 Device sample rate
This is the device sample rate in samples per seconds. Please note that the baseband sample rate should not be lower than this rate for correct audio operation of AM, NFM and SSB plugins.
☞ Using devices with sample rates lower than 48000 S/s may allow baseband sample rates lower than 48 kS/s with AM, NFM and SSB plugins. This is not true for wideband plugins (BFM, WFM) that use baseband rates in accordance with the RF bandwidth required nor for DSD plugin that uses internally a fixed channel rate of 48 kS/s to be able to decode symbols properly.
☞ The DSD demodulator plugin accepts only audio sample rates of 48000 or 8000 S/s to process audio properly.
3.4 System default device
The device that is configured as system default is marked with a grey background behind its name
3.5 Selected device
The device currently selected is marked in the selection color (orange). Use the mouse or the arrow keys to change selection.
3.6 OK button
Use this button to confirm your selection and close dialog.
3.7 Cancel button
Use this button to dismiss your selection and close dialog.