4.2 KiB
AM modulator plugin
Introduction
This plugin can be used to generate a narrowband amplitude modulated signal. "Narrowband" means that the bandwidth can vary from 1 to 40 kHz.
Interface
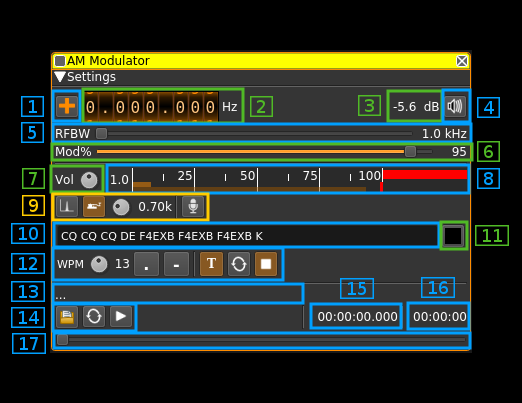
1: Frequency shift from center frequency of reception direction
The "+/-" button on the left side of the dial toggles between positive and negative shift.
2: Frequency shift from center frequency of reception value
Use the wheels to adjust the frequency shift in Hz from the center frequency of reception. Left click on a digit sets the cursor position at this digit. Right click on a digit sets all digits on the right to zero. This effectively floors value at the digit position.
3: Channel power
Average total power in dB relative to a +/- 1.0 amplitude signal generated in the pass band.
4: Channel mute
Use this button to toggle mute for this channel.
5: RF bandwidth
This is the bandwidth in kHz of the channel signal filtered after modulation. It can be set continuously in 1 kHz steps from 1 to 40 kHz.
6: Modulation level
Adjusts the AM modulation level in %
7: Volume
This is the volume of the audio signal from 0.0 (mute) to 2.0 (maximum). It can be varied continuously in 0.1 steps using the dial button.
8: Level meter in %
- top bar (beige): average value
- bottom bar (brown): instantaneous peak value
- tip vertical bar (bright red): peak hold value
You should aim at keepimg the peak value below 100% using the volume control
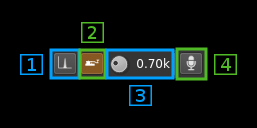
9: Input source control
9.1: Tone input select
Switches to the tone input. You must switch it off to make other inputs available.
9.2: Morse keyer input select
Switches to the Morse keyer input. You must switch it off to make other inputs available.
9.3: Tone frequency (kHz)
Adjusts the tone frequency from 0.1 to 2.5 kHz in 0.01 kHz steps
9.4: Audio input select
Switches to the audio input. You must switch it off to make other inputs available.
10: CW (Morse) text
Enter the text to be keyed when Morse input is active and in text mode
11: Clear CW text
Clears the CW (Morse) text
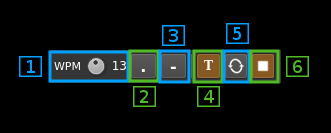
12: Morse keyer controls
12.1: CW keying speed
Sets the CW speed in Words Per Minute (WPM). This is based on the word "PARIS" sent 5 times. For 5 WPM the dot length is 240 ms. In other terms the dot length is calculated as 1.2 / WPM seconds. The dot length is used as the base to compute other timings:
- Element (dot or dash) silence separator: 1 dot length
- Dash: 3 dot lengths
- Character silence separator: 3 dot lengths
- Word silence separator: 7 dot lengths
12.2: Dots keying
Switch this button to send dots continuously
12.3: Dashes keying
Switch this button to send dashes continuously
12.4: Text keying
Switch this button to send the text typed into the text box (10)
12.5: Text auto repeat
Switch this button to auto repeat the text keying
12.6: Text play/stop
Use this button to stop sending text. When resuming keying restarts at the start of text
13: Audio file path
The path to the selected audio file to be played or dots if unselected
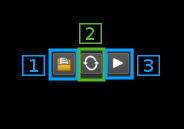
14: Audio file play controls
14.1: Audio file select
Opens a file dialog to select the audio file to be played. It must be mono 48 kHz 16LE raw format.
14.2: Audio file loop
Audio replay file at the end
14.3: Play/pause file play
Toggle play/pause file play. When paused the slider below (17) can be used to randomly set the position in the file when re-starting.
15: Play file current position
This is the current audio file play position in time units relative to the start
16: Play file length
This is the audio file play length in time units
17: Play file position slider
This slider can be used to randomly set the currennt position in the file when file play is in pause state (button 14.3)


