Add sizeToContents in ChannelGUI and FeatureGUI, called when widget is rolled, so we can remove resizing code from all of the individual channels and features. In RollupContents, use minimumSizeHint for calculated size, so that minimumWidth can come from .ui file. In DeviceGUI::sizeToContents(), call adjustSize(), so Device GUIs start out at minimum needed size (which should restore appearance prior to last patch). In stackSubWindows, use available space for channels if no spectrum/features present. In stackSubWindows, fix spectrum from being sized too big, resulting in scroll bars appearing. Reset user-defined channel width in stackSubWindows, when channels are removed. Don't stack maximized windows. There's one hack in Channel/FeatureGUI::maximizeWindow(). It seems that when maximimzing a window, QOpenGLWidgets aren't always paint properly immediately afterwards, so the code forces an additional update. I can't see why the first call to paintGL doesn't work. |
||
|---|---|---|
| .. | ||
| channelgui.cpp | ||
| channelgui.h | ||
| readme.md | ||
Channel common controls
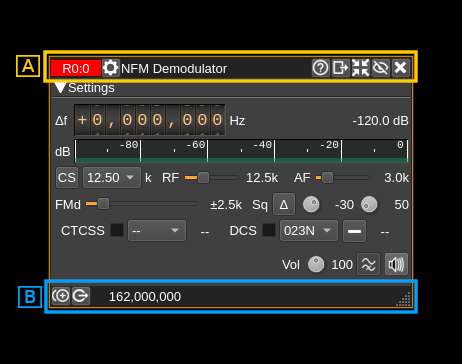
The channel windows have common top and bottom bars
A: Top bar
A.1: Index
The format is:
- Device reference to which the channel is attached. This is the device type and its index. See device window documentation
- Semicolon separator
- Channel index in device set
Additionally when the channel is a single stream channel and attached to a MIMO device:
- Dot separator
- Stream index
The tooltip shows the device type to which the channel is attached, its sequence number and serial number of the device if it exists. It also displays the channel type separated by a slash. For example: HackRF[0] 88869dc3878a51 / SSB Demodulator
You may click on this area and drag the window with the mouse.
A.2: Common channel settings
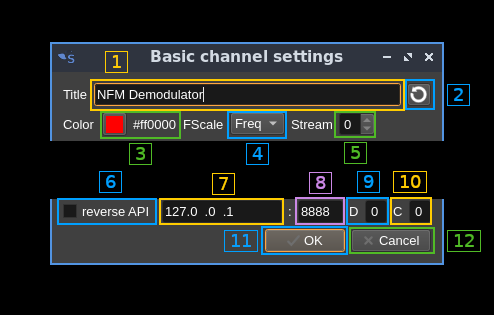
Opens a dialog to update the common channel settings
A.2.1: Window title
Changes the channel window title
A.2.2: Reset title to default
Resets the title to the channel type name.
A.2.3: Channel color
Changes the color of the window title bar and spectrum overlay. To change the color click on the color square to open a color chooser dialog. The hex rgb value is displayed next to the color square.
A.2.4: Frequency scale display type
When the mouse is over the channel window or over the central line in the spectrum a channel parameter is displayed on the frequency scale. This parameter can be:
- Freq: channel absolute center frequency
- Title: channel window title
- AdSnd: UDP address and send port
- AdRcv: UDP address and receive port
A.2.5: Device stream assignment
If the device is a MIMO device and the channel is single stream based i.e. not MIMO as well this sets the MIMO stream the channel will take its I/Q input from. It is disabled in other cases.
A.2.6: Toggle reverse API feature
Use this checkbox to toggle on/off the reverse API feature. With reverse API engaged the changes in the channel settings are forwarded to an API endpoint given by address (A.2.7), port (A.2.8), device index (A.2.9) and channel index (A.2.10) in the same format as the SDRangel REST API channel settings endpoint. With the values of the screenshot the API URL is: http://127.0.0.1:8888/sdrangel/deviceset/0/channel/0/settings The JSON payload follows the same format as the SDRangel REST API channel settings. Using the same example this would be:
{
  "SSBDemodSettings": {
    "agc": 0,
    "agcClamping": 0,
    "agcPowerThreshold": -40,
    "agcThresholdGate": 4,
    "agcTimeLog2": 7,
    "audioBinaural": 0,
    "audioDeviceName": "System default device",
    "audioFlipChannels": 0,
    "audioMute": 0,
    "dsb": 0,
    "inputFrequencyOffset": 0,
    "lowCutoff": 300,
    "rfBandwidth": 3000,
    "rgbColor": -16711936,
    "spanLog2": 3,
    "title": "SSB Demodulator",
    "volume": 3
  },
  "channelType": "SSBDemod",
  "tx": 0
}
Note that the PATCH method is used. The full set of parameters is sent only when the reverse API is toggled on or a full settings update is done.
More details on this feature can be found on the corresponding Wiki page.
A.2.7: API address
This is the IP address of the API endpoint
A.2.8: API port
This is the IP port of the API endpoint
A.2.9: Device index
This is the targeted device index
A.2.10: Channel index
This is the targeted channel index
A.2.11: Cancel changes and exit dialog
Do not make any changes and exit dialog
A.2.12: Validate and exit dialog
Validates the data (saves it in the channel marker object) and exits the dialog
A.3: Title
This is the default channel title or as set with (A.2.1).
You may click on this area and drag the window with the mouse.
A.4: Help
Clicking on this button opens the documentation about the channel controls in github in the browser.
A.5: Move to another workspace
Opens a dialog to choose a destination workspace to move the channel window to. Nothing happens if the same workspace is selected.
A.6: Shrink window
Click this button to reduce the window to its minimum size
A.7: Hide window
Click this button to hide the channel window
A.8: Close window
Click this button to close the window and removes the channel from the device set.
B: Bottom bar
B.1: Duplicate channel
Creates a new channel with the same settings
B.2: Attach channel to another device
Opens a dialog to select the destination device. Nothing happens if the destination device is the same as the current device.
B.3: Absolute channel center frequency
This is the absolute frequency in Hz of the channel center. It is the sum of the device center frequency and the channel shift.
You may click on this area and drag the window with the mouse.
B.4: Status message
The status messages appear here if any.
You may click on this area and drag the window with the mouse.


